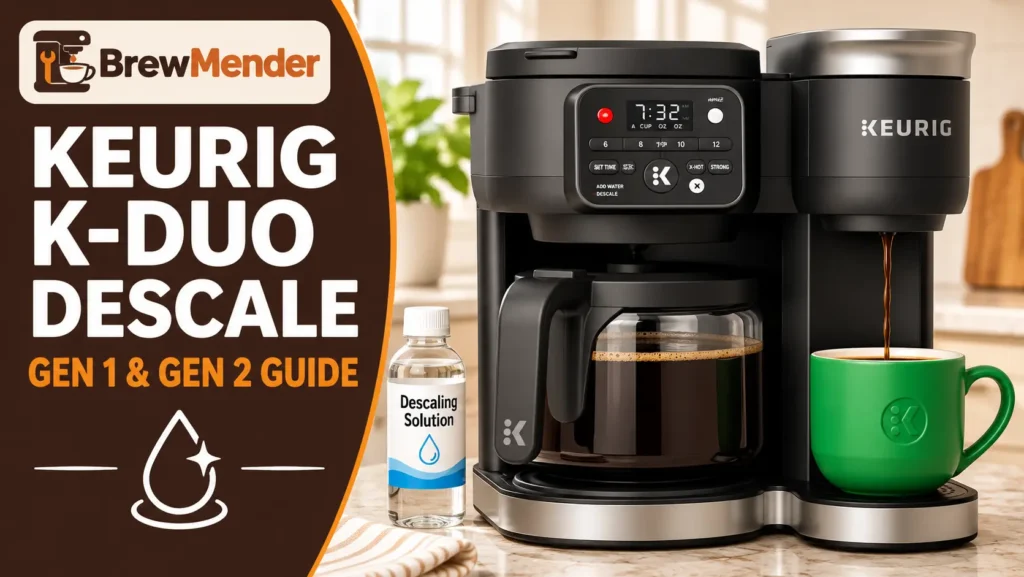
A Keurig K-Duo descale follows one of two procedures, and your brewer’s generation decides which. The two Gen 2 Hot & Iced models have a Descale Mode that you start by holding CUPS and OZ together for 3 seconds. The original K-Duo, K-Duo Plus, K-Duo Special Edition and first K-Duo Essentials have no Descale Mode: you run the solution through both sides by hand, let it stand for 30 minutes, then rinse eight times. Identify your model below before you pour anything in.
Keurig K-Duo Descale: Identify Your Model First
Keurig’s descaling page lists six K-Duo brewers, and their guides show three different control layouts. Read the name on the front, the box or your receipt, then confirm it with the buttons. Most owners just call it the Keurig Duo, but "Duo" alone does not tell you which steps to follow.
| Model | How to recognize it | Descaling method |
|---|---|---|
| K-Duo (Gen 1) | POWER, POD and CARAFE buttons; 6, 8, 10, 12 size buttons; clock with H and M buttons; glass carafe on a heating plate | Manual steps, no Descale Mode |
| K-Duo Special Edition | Keurig links it to the same guide as the Gen 1 K-Duo | Manual steps, no Descale Mode |
| K-Duo Plus | Same buttons as the Gen 1 K-Duo; stainless steel thermal carafe on the drip tray; reservoir moves to the left, right or back | Manual steps, no heating plate |
| K-Duo Essentials (Gen 1) | OZ and CUPS buttons plus 8, 10, 12 size buttons; Add Water light; no BREW button, no clock; glass carafe on a heating plate | Manual steps, no Descale Mode |
| K-Duo Hot & Iced (Gen 2) | OZ, CUPS and a separate BREW button, plus STRONG, X-HOT, SET TIME and AUTO BREW buttons and a clock | Descale Mode: hold CUPS + OZ |
| K-Duo Essentials Hot & Iced (Gen 2) | OZ, CUPS, BREW and STRONG buttons; ADD WATER and DESCALE lights; 8, 10, 12 lights on each side; no clock | Descale Mode: hold CUPS + OZ |
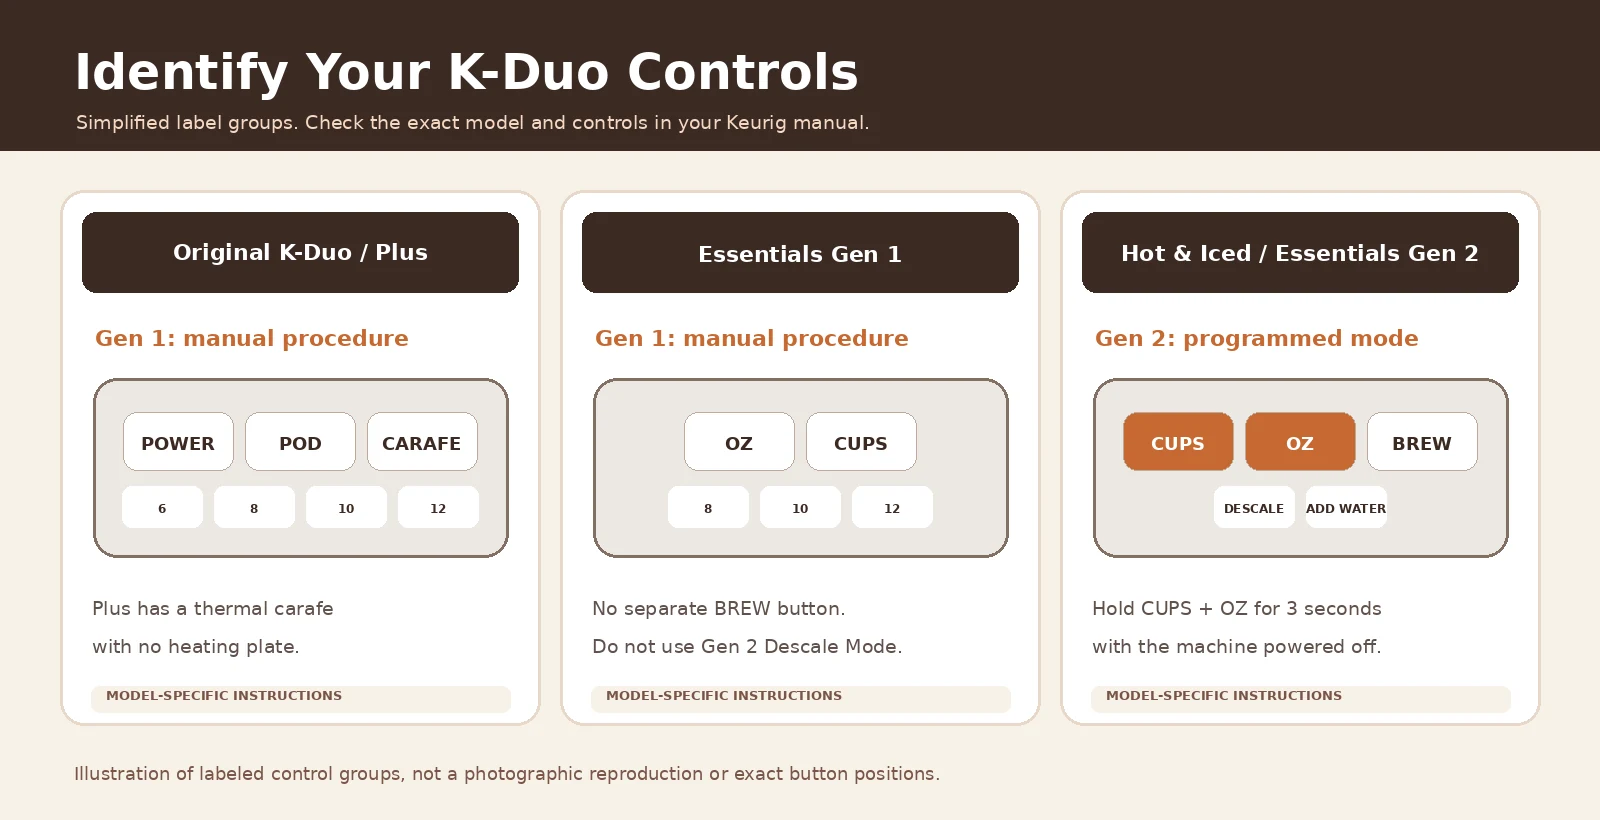
Both Gen 2 brewers carry "Hot & Iced" in their names on Keurig’s descaling page. If your brewer has OZ and CUPS buttons but no BREW button, it is the Gen 1 Essentials, and holding CUPS + OZ is not a step in its guide.
Still unsure? The serial label can confirm the model. Our K-Duo carafe replacement guide explains where to find it and which number prefixes Keurig lists for each version.
What You Need Before Descaling
Every K-Duo guide lists the same supplies. Gather them before you start, because the rinse stage needs several refills in a row.
- One bottle of Keurig Descaling Solution. It is the only descaler the K-Duo guides name, and their amounts are written for it.
- Fresh water. The guides say not to use distilled water in these brewers. Bottled or filtered water is fine.
- A large ceramic mug that holds at least 12 oz. The guides say not to use a paper cup.
- The carafe and its lid, empty and in their brewing position.
- Access to a sink for the hot liquid.
- Time. Keurig puts the Gen 1 procedure at about 75 minutes. The Gen 2 guides give no total time.
Before you add solution, empty the reservoir and take out the water filter if you use one; set it aside until the end. Remove any K-Cup pod, and leave the filter basket empty: no paper filter and no coffee grounds.
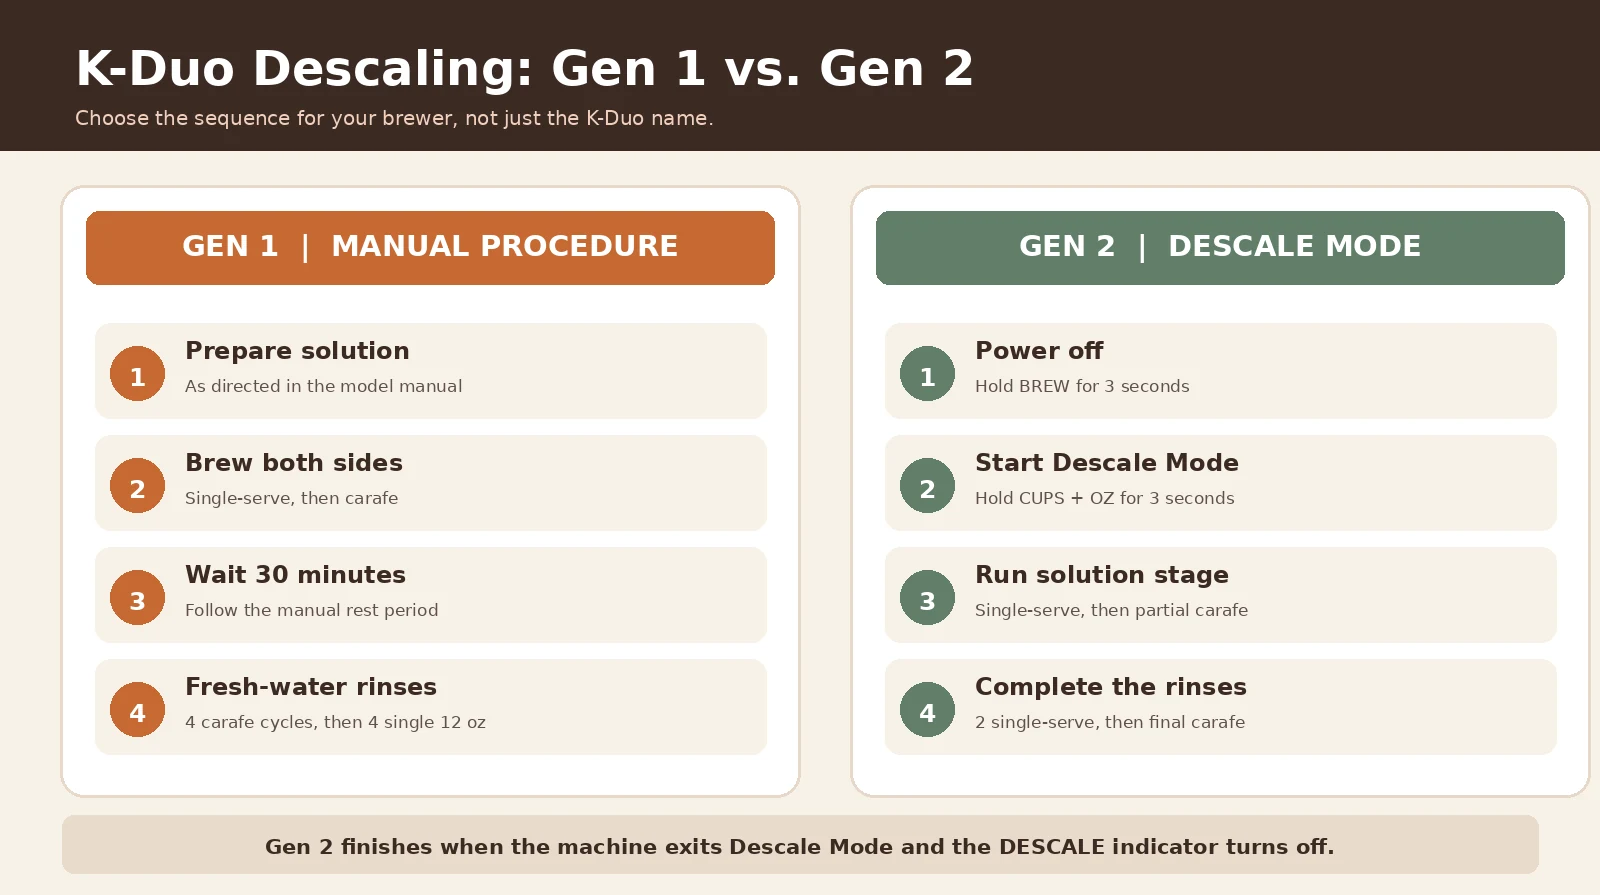
How to Descale a Keurig K-Duo Gen 1 (K-Duo, Special Edition, Plus and Essentials)
Keurig groups these four brewers under one procedure. The order of steps is identical; only the button names change, and the K-Duo Plus skips the heating plate. Use this button key as you go:
| Action | K-Duo, Special Edition, Plus | K-Duo Essentials (Gen 1) |
|---|---|---|
| 12 oz single-cup brew | POWER, then POD, then 12, then BREW | OZ, then 12 (the brew starts) |
| 12-cup carafe brew | POWER if off, then CARAFE, then 12, then BREW | CUPS, then 12 |
| Turn the heating plate off | Hold CARAFE until its red light goes out, or press POWER (Plus: no heating plate) | Hold CUPS until its red light goes out |
Step 1: Run the solution through both sides
- Empty the water reservoir. Remove the water filter if you use one.
- On the original K-Duo, Special Edition and Plus, use POWER to switch the brewer off before starting. The Gen 1 Essentials guide does not document an equivalent power-off step in its descaling instructions, so use its stated OZ and CUPS controls rather than guessing a Gen 2 sequence.
- Pour the entire bottle of Keurig Descaling Solution into the empty reservoir. Fill the empty bottle with water and pour that in too.
- Place a large ceramic mug on the drip tray and brew a 12 oz single-cup rinse with no pod. Pour the hot liquid into the sink.
- Put the carafe in place: on the heating plate, or on the drip tray for the K-Duo Plus. Select the 12-cup carafe setting and start the solution-stage brew. Carefully discard the dispensed liquid. Selecting 12 cups does not guarantee a full 12-cup output when only the prepared solution is in the reservoir. Do not add extra descaler to force a full carafe.
- Turn the heating plate off (skip this on the K-Duo Plus).
Step 2: Let it stand for 30 minutes
- Leave the brewer to stand for at least 30 minutes.
- After 30 minutes, pour out any solution left in the reservoir and rinse the reservoir thoroughly.
Keurig’s general descaling page mentions 20 minutes in one line of this step. The three Use & Care Guides that cover these four models all say 30, so wait the full 30.
Step 3: Rinse with fresh water
- Fill the reservoir with fresh water to the MAX fill line.
- With the carafe in place, brew a 12-cup carafe rinse. Turn the heating plate off (not on the Plus), then pour the water into the sink.
- Refill to MAX and repeat until you have run four carafe rinses in total.
- Refill the reservoir, place the mug on the drip tray, and brew a 12 oz single-cup rinse. Pour it out.
- Repeat until you have run four 12 oz rinses in total. Keep enough water in the reservoir for each 12 oz brew.
How to Descale a Keurig K-Duo Gen 2 (Hot & Iced and Essentials Hot & Iced)
The K-Duo Hot & Iced guide and the K-Duo Essentials Gen 2 guide describe the same descaling sequence. Both use Descale Mode, which runs both sides in a set order and tells you when it is done.
Two details trip up Gen 2 owners:
- "Powered off" has a specific meaning. Both guides say to power off by pressing and holding BREW for 3 seconds. The brewer also turns itself off 5 minutes after the last brew.
- BREW + OZ is a different setting. Holding BREW and OZ for 3 seconds switches High Altitude Brewing Mode on or off. On the Essentials Gen 2, the 12 lights on both sides flash; on the Hot & Iced, ALT and a mountain icon appear on the screen. If that happens, repeat BREW + OZ from off to undo it, then use CUPS + OZ.
Step 1: Prepare the brewer
- Empty the water reservoir. Remove the water filter if you use one.
- Leave the brewer plugged in and powered off.
- Pour the entire bottle of Keurig Descaling Solution into the empty reservoir. Fill the empty bottle with water and pour that in too. Add no pods or coffee grounds.
- Place a large ceramic mug on the drip tray and make sure the carafe is on the heating plate.
Step 2: Enter Descale Mode and run the solution
- Press and hold the CUPS and OZ buttons together for 3 seconds.
- Press the flashing BREW button to run the single-serve descale cycle.
- When it finishes, press the flashing BREW button again to run the carafe descale cycle. This is only a partial brew, so a short carafe is expected.
- The ADD WATER light turns on when the carafe cycle is done. That marks the end of the solution stage, not the whole job. Pour the mug and carafe into the sink and rinse them.
Step 3: Rinse with fresh water
- Discard any liquid left in the reservoir and rinse it. Fill it with fresh water to the MAX FILL line.
- Press the flashing BREW button for the first single-serve rinse. Pour the hot water into the sink.
- Press the flashing BREW button for a second single-serve rinse. Pour it out.
- Press the flashing BREW button for the carafe rinse. This brew empties the reservoir. Pour it out.
How to Confirm Your K-Duo Descaling Is Complete
Gen 1, Plus, Essentials Gen 1
- The solution passed through both brewing paths.
- The brewer rested for the documented 30 minutes.
- Four carafe fresh-water rinses are complete.
- Four 12 oz single-cup fresh-water rinses are complete.
- These guides do not identify a separate completion light.
Gen 2 Hot & Iced family
- The single-serve solution cycle finished.
- The partial carafe solution cycle finished.
- Two single-serve fresh-water rinses finished.
- The final carafe rinse completed.
- Descale Mode exited and the DESCALE indicator switched off.
If a problem remains, use the symptom checks below instead of guessing a reset combination.
K-Duo Descaling Problems and What to Check
If descaling stops early or the result seems wrong, compare the step with your exact model’s guide. A skipped step or scale buildup may be involved, but neither is a confirmed diagnosis just from the symptom.
| What happens | Check first | If that does not fix it |
|---|---|---|
| Gen 2 will not enter Descale Mode | Brewer plugged in and off (hold BREW 3 seconds), no pod, and CUPS + OZ held together, not BREW + OZ. The BREW button should then flash. | Confirm it is a Gen 2 model. If it still will not respond, contact Keurig. |
| Foam comes out | Keurig’s guides call this normal: the solution is reacting with scale. | Keep going. |
| Little or no water, then an air-blowing sound | This may indicate heavy scale. Follow your manual’s recovery directions: turn off and unplug, discard the solution, rinse the reservoir, refill with fresh water, and resume the prescribed rinse. | Leave the brewer unplugged for at least 30 minutes, then continue the rinse. Still no flow? Stop and see Keurig not pumping water. |
| Gen 2 carafe descale stops early | Expected: the guide calls it a partial brew. | Continue once ADD WATER lights. |
| ADD WATER stays on after a refill | Water filled to MAX and not above it; reservoir pressed down and seated. | Contact Keurig, as the guides direct. |
| All buttons blink at once | No owner fix is given in the guides. | Contact Keurig. |
| Cups still come out short afterward | Enough water for the size chosen; exit needle cleaned; filter basket rinsed so the drip stop is clear. | Gen 1 and Plus: contact Keurig after two complete descales. Gen 2: contact Keurig after one. See Keurig not brewing a full cup. |
| Brewer shuts off or has no power | Its own grounded outlet, not a circuit shared with other appliances. Auto-off timing and carafe heating-plate behavior vary by model. Do not treat them as the same on every K-Duo. | See Keurig won’t turn on after descaling. |
If the DESCALE light stays on after you finish every step for your model, our descale light troubleshooting guide covers that symptom. Do not repeat the chemical cycle unless the correct model guide directs you to do so.
How Often Should You Descale Your K-Duo?
The K-Duo manuals generally recommend descaling every 3 months. The Gen 2 guides also say to descale when the indicator appears, if sooner. Some K-Duo Plus guidance mentions 3 to 6 months, so check the instructions for your exact unit. Most of the guides also say to descale sooner if you notice low coffee volume or slower brewing.
Minerals in your water set the pace. The guides say scale can build up faster in some water, which can mean descaling more often. Keurig’s general descaling page gives 3 to 6 months across all its brewers, and the K-Duo Plus guide mentions both figures; for a K-Duo, the 3-month figure in its own guide is the safer reference.
The guides add one more trigger: descale before and after storing the brewer for a few months or more. If the brewer was unused for a short time, follow your particular model’s cleansing-brew directions. For longer storage, follow its storage and descaling guidance rather than assuming a rinse replaces descaling.
For how water hardness and daily use change the schedule, see how often to descale a Keurig.
What Descaling Solution Should You Use?
The documented K-Duo procedures specify Keurig Descaling Solution. All five K-Duo guides name it, and the "whole bottle plus one bottle of water" amount is written for that product. None of them mentions vinegar, citric acid or another brand’s descaler, so none of their steps tells you how much of those to use or how long to rinse.
The manuals do not specify recipes or rinse cycles for homemade descaling mixtures. Before using another product, check what Keurig supports for your particular brewer. Never mix descaling solution with vinegar or another cleaner. Our Keurig descaler comparison covers what Keurig documents and what it does not.
Descaling and routine cleaning are different tasks. Descaling targets mineral deposits in the internal water path. Routine cleaning covers accessible parts; follow the care instructions for each part. The manuals warn against placing the listed removable parts in a dishwasher. Our guide to cleaning a Keurig without vinegar explains that routine in more detail.
When to Stop and Contact Keurig
Stop, unplug the brewer if you can do so safely, and do not use it again until Keurig has advised you if you notice:
- smoke, sparks or a burning smell
- a damaged power cord or plug
- water leaking onto the counter near the plug or base
- a circuit breaker that trips while the brewer runs
Contact Keurig at 1-866-901-BREW (2739) if all the buttons blink at once, if ADD WATER stays on after a correct refill, if water will not flow after the recovery steps above, or if short cups continue after the number of descales your guide gives. Have your model name, serial number and the last step you completed ready.
Keurig’s guides say the K-Duo is not user serviceable beyond the documented cleaning and descaling. Do not open the housing or try an undocumented button reset. If your brewer needs warranty service, Keurig asks you to call first for a return authorization number rather than shipping the brewer back.