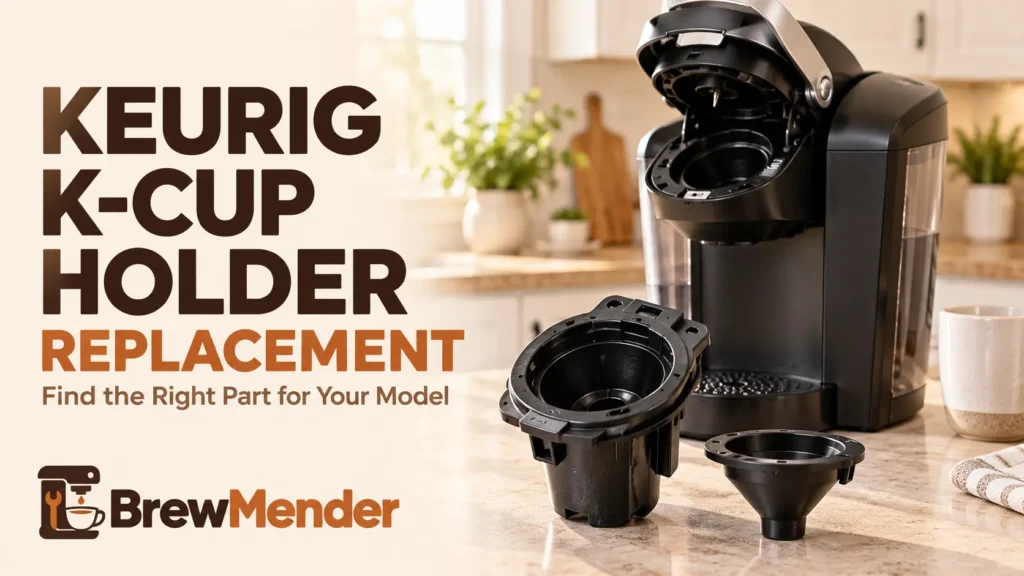
A Keurig K Cup holder replacement should match your exact brewer, not just look like the old piece. Before ordering, check whether the pod holder is actually damaged, identify the model and generation, and compare the replacement’s included parts. A clogged needle or loose funnel can cause brewing trouble without requiring a new holder.
- Identify your brewer: K10 MINI Plus, K-Mini Plus and K-Mini Mate are not interchangeable model names.
- Inspect first: clean or reseat an intact holder; replace a genuinely broken part.
- Match components: a holder, a funnel and a Keurig 2.0 assembly may be sold separately.
- Confirm fit: the same removal procedure does not prove replacement-part compatibility.
- Stay safe: unplug, cool down and keep fingers away from sharp pod-piercing needles.
Keurig K-Cup Holder Replacement: What to Check First
Use the symptoms below to decide whether cleaning, reseating or replacing makes sense. These are possible explanations, not confirmed diagnoses.
| What you notice | Possible explanation | Best next step |
|---|---|---|
| Cracked holder, broken tab or damaged exit needle | Visible physical damage to a removable component | Replace the damaged component only after checking exact model fit. |
| Grounds in your cup | Debris or a blocked exit needle; pod or holder may not be seated correctly | Clean and reseat. Do not assume the whole holder is defective. |
| Short cup or weak flow | Needle obstruction, scale or another water-path issue | Clean first; follow the short-cup troubleshooting steps. |
| No water despite an active brew | Reservoir, pump or another water-delivery problem | Start with the no-flow diagnostic checks. |
| Pods split or spray grounds | Pod damage, seating or restricted outlet; cause depends on the model | Inspect safely; use the bursting K-Cup checklist. |
| Liquid underneath the machine | Reservoir leak, spill, holder seating or an internal fault | Unplug if leaking near electricity; use the leak-source guide. |
| Handle will not close or funnel is loose | Obstruction, unseated component or broken plastic | Reseat without force; replace only what is broken. |
Clean or Replace? Inspect the Parts Safely
- Turn off and unplug the brewer. Let it cool completely before touching the pod holder or its surrounding parts.
- Consult the Use & Care Guide for your exact model, then remove the holder only in the way Keurig documents.
- Check the holder and its tabs for cracks; inspect the funnel and the exit needle without putting your fingers into the needle chamber.
- If everything is intact, clean the removable holder and funnel using the model’s instructions, then reseat them. A blockage can mimic a failed part.
- If a tab, funnel or integrated exit needle is physically damaged, ask Keurig about a matching replacement. Do not bend the needle back with pliers or force the assembly into place.
For example, Keurig’s K55 guide documents how its holder releases and how the funnel snaps off. Keurig’s pod-holder cleaning instructions also cover accessible cleaning and sharp-needle precautions. Do not apply one model’s needle-cleaning technique to every brewer.
Identify Your Exact Keurig Model Before Shopping
The easiest starting point is the brewer’s box, purchase confirmation or user guide. For the serial number, Keurig’s official serial-number location guide shows different positions by model. On many machines it is behind the reservoir; certain models have it underneath. A serial number helps support identify a unit, but is not itself proof of part fit.
- Record the exact brewer name and any generation name, such as K-Duo Essentials or K-Café Smart.
- Photograph the old holder from several angles, including tabs and funnel, without touching the needles.
- Count the removable components and compare their shapes with a proposed listing.
- Check that the listing explicitly names your model and tells you what is included. Contact Keurig or the seller if either point is unclear.
Keurig Pod Holder Compatibility by Model
This table separates what Keurig’s documentation says about holder design from actual replacement-part compatibility. Similar parts and removal steps do not establish interchangeability. Unless otherwise noted, no particular aftermarket holder has been independently confirmed for the models below.
| Brewer or family | What is documented | Replacement buying status |
|---|---|---|
| K-Mini Mate and K-Mini Mate Plus | Keurig lists a replacement pod holder specifically for these two models. | Manufacturer-listed part for both named models. Check current availability and the exact product before ordering. |
| K-Classic / K55 | Official K55 guide: lift handle, push the holder up from underneath, align front ribs to reinstall; funnel snaps off. | Removal documented; no specific aftermarket fit established here. |
| K-Compact / K35, K-Elite and K-Select | Guides describe removable holders and a snap-on funnel. | Part interchangeability not established by similar instructions. |
| K-Supreme, K-Slim and K-Express | Removable pod-holder instructions exist in their individual guides. | Specific compatible replacement part not confirmed; match exact model. |
| K-Iced Essentials and K-Iced Plus | The guides document cleaning access to holder parts. | Specific aftermarket replacement fit not confirmed. |
| K-Mini and K-Mini Go | Both have owner cleaning instructions, but they are distinct model names. | Do not infer the K-Mini Mate official holder fits either one. |
| K-Mini Plus (modern model) | Keurig lists this as a distinct brewer in its serial-number guide. | Do not treat it as the legacy MINI Plus K10 or the K-Mini Mate. |
| Legacy MINI Plus K10 / B31 | Older design; a separate independent removal guide exists. | Check recall status first. Replacement fit is not confirmed. |
| K-Duo Plus, K-Duo Special Edition, K-Duo Essentials | Individual official guides document owner access to the pod holder; assembly details vary. | Do not assume an aftermarket listing that simply says “K-Duo” covers your generation. |
| K-Café, K-Café Smart, K-Café Essentials, Barista Bar | Their guides describe holder removal for cleaning, not the K200 release-button arrangement. | Do not buy a 2.0 assembly for a K-Café based only on appearance. |
| Keurig 2.0 K200 series | The K200 guide distinguishes pod holder, housing and base, with side release buttons. | Keurig has a 2.0 portion pod holder listing, but current part contents and exact fit must be checked. |
| Other Keurig 2.0 (K300 through K550 families) | The K200 instructions should not automatically be extended to every 2.0 generation. | Model-specific assembly fit not confirmed in this review. |
K-Crema owners: This brewer has a pod holder with a pressure arm and a separate funnel. A holder from another Keurig model is not automatically compatible. Our K-Crema review explains its Pressure brewing system and the limits to consider before replacing parts.
Know Which Component You Actually Need
Classic-style holder, funnel and needle
On many Keurig models the pod holder is the cup-shaped part that holds the K-Cup. A removable funnel attaches underneath it. The exit needle sits in the holder’s bottom, while the entrance needle is in the lid above. The housing that receives the holder is another component, and is not necessarily an owner-replaceable part.
If only a removable funnel is broken, ask Keurig whether that funnel is available separately for your model. Do not buy a whole holder without checking. If the exit needle is broken, do not attempt to straighten or replace the needle independently unless the manufacturer supports a specific procedure.
Keurig 2.0 K200 holder, housing and base
The K200 manual separates the pod holder, housing and base. Keurig calls the holder and housing together the “pod holder assembly”; the base is shown separately. A marketplace “full assembly” may or may not include all three. Compare the actual listing contents with the K200 instructions before paying.
Where to Find a Replacement Pod Holder
1. Official Keurig replacement parts
For the K-Mini Mate and K-Mini Mate Plus, Keurig offers a named replacement pod holder. For other models, start with Keurig’s spare parts catalog or support and check your exact model and current availability. Do not assume the Mate part fits an older K-Mini.
Manufacturer product page, not an Amazon affiliate link. Confirm current availability on Keurig’s website.
2. Amazon listings for classic-style holders
Marketplaces carry replacement holders for older K-series and some later brewers. However, a listing that says “fits Classic, K-Elite, K-Supreme and K-Duo” is still the seller’s compatibility claim, not proof that the part fits every generation. Compare the listing’s precise model list, exit-needle location, funnel and return terms.
Affiliate disclosure: As an Amazon Associate I earn from qualifying purchases. The Amazon links below are paid links. They open search results, not an independently fit-verified product. Read our affiliate disclosure.
Amazon search results. Check the complete model number, included funnel and product photos before buying. (paid link)
3. Amazon listings for Keurig 2.0 assemblies
Keurig 2.0 assemblies can include more components than classic-style holders. For the K200, make sure the listing distinguishes the holder, housing and base. Do not treat a seller’s “fits all 2.0” wording as manufacturer confirmation, particularly for other 2.0 generations.
Amazon search results. Confirm your 2.0 generation and every piece in the package before ordering. (paid link)
How to Remove and Reinstall the Holder Safely
Many classic-style models: push-up removal
Keurig documents this general approach for models including K55, K-Elite, K-Select, K-Supreme and several newer variants. Follow your specific model’s guide before starting.
- Remove any used pod, turn off the brewer, unplug it, and allow the brew head to cool.
- Lift the handle. Hold the top of the removable pod holder while pressing its underside upward as the manual shows until it releases.
- Inspect the old holder, funnel and tabs without placing fingers near the needles.
- If your model documents a detachable funnel and the replacement does not include one, transfer only an undamaged funnel in the manner shown in your model’s instructions.
- Align the replacement holder with the opening and the front ribs or slots shown in your manual, then snap it into place without force.
- Lower the handle. If the guide supports a water-only brew without a pod, you may use one as a preliminary flow and leak check. A successful brew does not independently prove replacement-part compatibility.
See the K55 Use & Care Guide or the guide that matches your own machine for its illustrations. If your holder’s release action differs, stop instead of prying.
Keurig 2.0 K200: separate the housing and base
The K200 has a different documented cleaning removal method:
- Unplug and cool the brewer; lift the handle.
- Push up while holding the sides of the pod holder assembly and remove it from the brewer.
- Remove the assembly and the base.
- Press the buttons on both sides to separate the pod holder from the housing.
- After cleaning or inspecting, reassemble the holder and housing, reinstall the base and assembly, and lower the handle as the K200 manual shows.
These instructions are for the K200 design only. Do not automatically apply them to K300, K400 or K500 generations.
Models with unresolved release differences
Older K10 MINI Plus and some K-Duo independent guides describe different release actions from the official instructions for other models. Use your model’s Keurig manual or contact support. Do not pry the assembly to imitate a different brewer.
What If the Replacement Will Not Fit or Brewing Is Still Wrong?
- It will not seat or the handle resists closing: stop immediately. Recheck the model and part shape rather than pressing harder.
- It lifts out with the used pod: check the seating described in your manual. If loose, stop using it; it may be incompatible or damaged.
- It is missing a funnel or base: compare the listing’s included components with your original parts before using the brewer.
- Water leaks, sprays or pools near the base: unplug safely and stop. Do not troubleshoot exposed electrical areas.
- Flow stays weak: the problem may be elsewhere. Return to the symptom table and use the appropriate troubleshooting article.
When You Should Skip the Purchase
Do not buy a holder if cleaning and reseating are the only unresolved checks, if the issue is actually the lid’s entrance needle or an internal water-path fault, or if Keurig can resolve the problem under warranty. If you see sparks, smell burning, notice a damaged power cord or find water near electrical parts, stop using the brewer and contact support.
A marketplace listing also is not worth the risk when it names only a broad family instead of your exact model, omits included parts or has no sensible return path. An inexpensive part that does not fit is not a repair.
Before You Order: 5-Point Checklist
- Confirm your exact model and generation; check the special K10 recall notice if applicable.
- Verify that the broken component is the holder, funnel or another accessible assembly piece.
- Prefer a manufacturer-listed replacement where Keurig names your exact model.
- For aftermarket parts, check model claims, photos, included pieces and returns; do not rely on appearance alone.
- Before installation, unplug, cool down and follow only the correct model’s instructions.
If the fit remains uncertain, ask Keurig Support before spending money. That is safer than forcing an approximate replacement into the brew head.